Pro Tools LE™ Latency Charts
For Digi 002® and 002 Rack™
mixing latencies:
using external analog gear for signal processing
We all love the convenience of mixing in the box. But there are times when leaving the digital domain is worth the trip. Not all of the gear we love most is available in plug-in form. And not all plug-ins sound as good as their analog counterparts. Well, let's be honest - hardly any do.
Latencies vary with both sample rate and buffer size. Determining the exact number of samples you need to compensate for can be a groove-busting hassle. Memorizing all those numbers is a task most of us would rather avoid. Below is a chart to save you that hassle, listing latencies for analog I/O paths at all sample rates and hardware buffer sizes available on 002 and 002R systems. I should add that I did the tests to determine these numbers using an 002R. I'm assuming that the 002 has the same circuitry. If it doesn't, then these numbers only apply to the 002R. I'm also assuming that you're using the built-in A/D and D/A converters. If you're using other converters, these numbers may not apply.
These latency figures can appear to be reduced with Low Latency Monitoring mode, but for purposes of a bounce to disk, LLM will not give you an accurate picture of your mix. It's called a "Monitoring" mode for a reason. If you use Low Latency Mode for tracking, be sure to return to normal latency mode for mixing. Otherwise, you may have some nasty surprises when you listen back to your bounced file. Elements in your mix may have different time characteristics than they appear to have in LLM, or they may be missing from the mix altogether.
| buffer setting | Delay in samples at a given sample rate | |||
|---|---|---|---|---|
| 44.1 KHz | 48 KHz | 88.2 KHz | 96 KHz | |
| 64 | 311 | 306 | n/a | n/a |
| 128 | 461 | 458 | 497 | 497 |
| 256 | 761 | 762 | 797 | 801 |
| 512 | 1361 | 1370 | 1397 | 1409 |
| 1024 | 2561 | 2586 | 2598 | 2625 |
| 2048 | n/a | n/a | 4997 | 5057 |
You should be aware that an analog roundtrip with an 002 is not a pristine audio experience. You are sacrificing a clearly perceptible amount of audio quality in the process. But sometimes it is worth it, no question. To begin gaining an awareness of the degree and kind of loss you're weighing in the balance, try this experiment:
- Make an audio track with some musical material on it. Call it Track A.
- Duplicate it (not the playlist, but the whole track, so that you have two audio tracks with the same material), and call it Track B.
- Put a TimeAdjuster plug-in on A, set for the number of samples in the chart above for your session sample rate and your current buffer setting, and engage the Invert (a.k.a. Phase) button.
- Put an analog i/o insert on B using any free input-output set, and patch a cable from the appropriate out to in.
- Control-click (Windows) or Command-click (Mac) the track indicator until the peak level is displayed on both tracks. Play a little and see if there is any difference in level - often there will be 0.1-0.3 dB of difference. Change the gain of track B to compensate for the level difference. Play a little again to make sure they're the same.
- Play the tracks. What you hear is the difference between the original signal and the reconverted signal. Scary, huh?
If you're a math-head, it's interesting to note the formulae that the analog latencies follow.
| Sample Rate: | 44.1 KHz | 48 KHz | 88.2 KHz | 96 KHz |
|---|---|---|---|---|
| Formula: | 2.34375*b+161 | 2.375*b+154 | 2.34375*b+198 | 2.375*b+193 |
where b is the hardware buffer
I'd love to know what's behind these formulae. I would have thought that the latency in samples would be the same at any sample rate, and would be simply L=2b+88, or maybe 2b+176.
How to...
When you choose to send out for a tasty tone, you have three options.
- Place an i/o insert on the track.
- Assign the track to an analog output other than 1 &/or 2, and return on an Aux track assigned to an analog input.
- Assign the track to any analog output other than 1 &/or 2, and record the output of the external device to a new audio track.
Methods 1 and 2 yield the same latency. The difference is that method 1 is simpler when only one track is being processed. Method 2 may be easier when more than one track is being processed at once; that is, when processing a submix. It is possible, of course, to submix to an aux track and place the i/o insert on the aux track.
For methods 1 and 2, you have to choose whether you will compensate by shifting the effected tracks earlier by the latency amount, or by placing a TimeAdjuster plug-in on all other tracks, setting them to the latency amount.
Method 3, printing the effect, is the simplest to deal with - no latency at all. PT compensates automatically. Of course, you're limiting your mix options for the moment by committing to a setting. That's not a problem once you're comfortable with your mixing skills, but it can be a little intimidating when you're still feeling your way. Of course, there's also the possibility of using a send assigned to an analog output, but that method addresses a different kind of circumstance than I have in view here, which is processing a whole track or a submix.
Let's look at each of these three methods in detail.
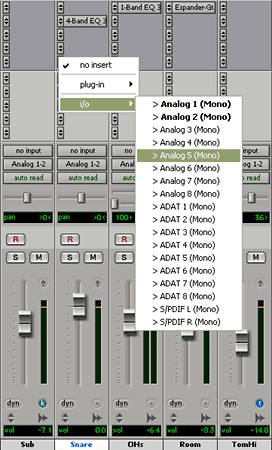
The I/O Insert Method
Say you have a snare drum track that needs an analog compressor. First thing you do is decide which input-output set to use. With i/o inserts, the input and output have the same number. E.g., in this case, I'm going to choose i/o Analog 5; that means the sound will go to output 5 and return to input 5. So, we hook up 002 analog output 5 to the compressor's input, and the compressor's output to 002 analog input 5.
Pay attention to your levels. The 002 outputs are +4 dBU, but many pieces of outboard gear are -10 dBV. In that situation, you may have to place a trim plug-in prior to the i/o insert to bring the level down about 12 dB in order to prevent overloading the gear's input. The 002's inputs 5-8 have level switches - make sure they're set appropriately for the gear you're connecting.
Next thing you do is put the i/o insert on the snare track. You can use any available insert point - plug-ins are allowed before and/or after it.
Now comes the fun part - compensating for the delay. Look at the chart, and see how many samples late the snare track will be at your buffer setting. You could slide the snare track earlier by that amount. But what if you forget that you slid it? Or if you send the mix to someone else to work on? Or if you find later that you need to increase your buffer setting a notch? It can get confusing. A better solution is to delay the other tracks with TimeAdjuster plug-ins. Put one on each track except the snare, and set each for the number of samples in the chart. The CPU power required by TA plugs is negligible.
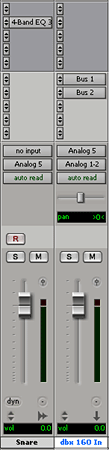
The Aux In Method
Instead of putting an i/o insert on our unruly snare track, we could assign its output to an analog out, and return it on an Aux track. This is almost self explanatory, but it has some additional caveates to consider.
It adds the complexity of moving your sends, and maybe some plug-ins. If you had a compressor plug-in before, and decided to use an analog one instead, you'll need to move any plug-ins that followed the compressor plug-in over to the Aux track. You'll also need to move any fx sends from the snare track to the Aux track. Thankfully, PT 7 finally allows us to just grab'em and slide'em. In earlier versions, we had to add a new send to the Aux track, look at the send it was replacing and put the same level setting on the new one.
With the Aux in method, it doesn't matter whether the input and output have the same number. It's usually easier to keep track of things if the numbers match, but you may go out any unused output and return on any unused input.
As with the I/O method, think through your gain staging issues, and decide on a delay compensation method. If you go with TimeAdjuster plugs (recommended), you should omit them from both the snare and its aux return track, of course.
The Re-record Method
Just like the Aux In method, except that instead of making an Aux track, you make an audio track. Put the track in record, and enter Input Only Monitoring mode. Fiddle with the settings on your gear until it sounds so good you can't stand it. Put PT in record and print the effect. De-activate the original track and hide it. You're done. No delay compensation necessary, because PT will automatically put it in the right place.
Well, that's partly true. If you want to hear it in context and in time while fiddling with the external gear, you will have to compensate for the duration of said fiddling. If you compensate by nudging the snare track (per the example at hand) earlier, remember to nudge or spot it to its former location before printing the effect. If you used the TimeAdjuster plug-ins, remove them after printing the effect so you hear all material in sync while it's printing.
DUC ID: daeron80
Written: April 2006
Copyright © 2006, all rights reserved
David's Personal Home Page